Sunmi Code Scanning Driver
Why to apply the code scanning driver
encapsulated by Sunmi
Sunmi has provided the code scanning driver
matching its own devices. Compared to the currently applied open source
solution, Sunmi code scanning driver has the following five advantages
1.
High recognition rate. Through a
lot of tests simulating real scenarios, Sunmi code
scanning driver has increased by 74% in
average in terms of code scanning recognition rate compared to the commonly
used code scanning solution based on ZXing open source project.
2.
Compared to ZXing solution, it
has increased by above 100% in terms of code scanning
speed of 1 D code.
3.
Simpler usage mode. You can add
code scanning function in your own project just by use
of five lines of code.
4.
Up to 15 types of code to
support scanning. More code types will be added subsequently.
5.
It perfectly matches the Sunmi
devices. The combination of software with hardware can
ensure highly efficient & stable
functions.
How to use Sunmi code scanning driver
There are two methods available for the
developers to use Sunmi code scanning driver
1.
The developer’s App invokes the
code scanning module integrated by Sunmi system to
complete code scanning and obtains the
return value. This is a simple & easy to use method.
2.
Write the camera interface by
himself/herself and invoke the code scanning driver
encapsulated by Sunmi to complete the
picture parse. This is a relatively complicated method, but it provides a
higher degree of freedom.
The first type of usage mode:
To reduce the development difficulty, Sunmi
set a built-in code scanning module in the newest SUNMI OS (V1 firmware version
187, M1 firmware version 37) system. The developer invokes Sunmi code scanning
module where it is necessary to invoke code scanning for the project via
startActivityForResult(), and then receives the return value of the code
scanning result in onActivityResult() method.
Receive the returned parameters of the code
scanning result in onActivityResult method. You may refer to the following
code:
    /**

    *

    *Creating a Intent at where you want start scanner, calling the scanner by startActiityForResult();

    */

    Intent intent = new Intent("com.summi.scan");

    intent.setPackage("com.sunmi.sunmiqrcodescanner");


    /**

    * The method is the same function as above

    *Intent intent = new Intent("com.summi.scan");

    *intent.setClassName("com.sunmi.sunmiqrcodescanner", "com.sunmi.sunmiqrcodescanner.activity.ScanActivity");

    */


    /**


    //there is also some options item about the scanner module, you can transfer parameters to control some settings, each item has a defaut status,transform parameter is not necessary,

    intent.putExtra("CURRENT_PPI", 0X0003);//The current preview resolution ,PPI_1920_1080 = 0X0001;PPI_1280_720 = 0X0002;PPI_BEST = 0X0003;

    intent.putExtra("PLAY_SOUND", true);// Prompt tone after scanning  ,default true

    intent.putExtra("PLAY_VIBRATE", false);//vibrate after scanning,default false,only support M1 right now.

    intent.putExtra("IDENTIFY_INVERSE_QR_CODE", true);//Whether to identify inverse code

    intent.putExtra("IDENTIFY_MORE_CODE", false);// Whether to identify several code,default false

    intent.putExtra("IS_SHOW_SETTING", true);// Wether display set up button  at the top-right corner,default true

    intent.putExtra("IS_SHOW_ALBUM", true);// Wether display album,default true

    */

    startActivityForResult(intent, START_SCAN);
The second type of usage mode:
@Override
protected void onActivityResult(int requestCode, int resultCode, Intent data) {
                if (requestCode == 1 && data != null) {
                        Bundle bundle = data.getExtras();
                        ArrayList> result = (ArrayList>) bundle
                                        .getSerializable("data");

                        Iterator> it = result.iterator();

                        while (it.hasNext()) {
                                HashMap hashMap = it.next();

                                Log.i("sunmi", hashMap.get("TYPE"));//this is the type of the code
                                Log.i("sunmi", hashMap.get("VALUE"));//this is the result of the code

                        }

                }
                super.onActivityResult(requestCode, resultCode, data);
        }
In principle, the developer is required to realize
the basic knowledge of android customized camera before developing his/her own
code scanning function by directly applying Sunmi code scanning library. Please
download resource file to check code comments in it. The basic usage
method for Sunmi code scanning driver is explained based on SunmiScanDemo as
follows, and this Demo is an eclipse project.
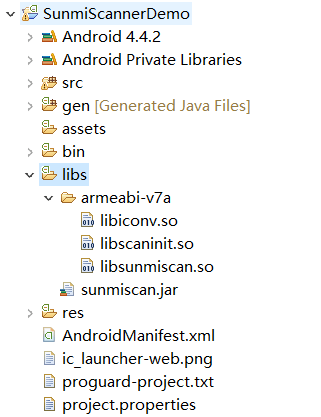
1.
Add four library files of libiconv.so,libscaninit.so,libsunmiscan.so and
sunmiscan.jar
according to the following hierarchy in
libs directory of the project.
2.
Introduce header files &
decoding library into the code to handle business. You may refer
to DEMO.
import com.sunmi.scan.Config;
import com.sunmi.scan.Image;
import com.sunmi.scan.ImageScanner;
import com.sunmi.scan.Symbol;
import com.sunmi.scan.SymbolSet; 3.
Initialization and
configuration.
private ImageScanner scanner;// declare the scanner
scanner = new ImageScanner();// create a scanner
scanner.setConfig(0, Config.X_DENSITY, 2);// the interval time of line
scanner.setConfig(0, Config.Y_DENSITY, 2);//the interval time of raw
scanner.setConfig(0, Config.ENABLE_MULTILESYMS, 0);
//turn on the multiple parse in one picture, 0 means one , 1 means multiple
scanner.setConfig(0, Config.ENABLE_INVERSE, 0);// turn on the reserve color ?
scanner.setConfig( Symbol.QRCODE,Config.ENABLE, 1);//enable QR, 1:enable(default);0:disable
scanner.setConfig( Symbol.PDF417,Config.ENABLE, 1);//enable PDF417, 1:enable;0:disable(default)
scanner.setConfig(Symbol.DataMatrix, Config.ENABLE, 1);//enable DataMatrix, 1:enable;0:disable(default)
scanner.setConfig(Symbol.AZTEC, Config.ENABLE, 1);//enable AZTEC, 1:enable;0:disable(default)
4.
Pass the image data and
decoding. The following code can be written in the method
PreviewCallback.onPreviewFrame(byte[] data,
Camera camera).
    /**

    creating image,width is the preview image's width and  height is the preview image's height,generally speaking,high generally speaking also means clearer image,but slower decoding speed.cause the decoding arithmetic need the the original data and the default format of the preview image is YCbCr_420_SP,you must transform the fromat, parameter "Y800" is the format of image what you want transform.

    */

    Image source = new Image(width, height, "Y800");


    /**

    *Set the scan area

    */

    Rect cropRect = finder_view.getScanImageRect(size.height, size.width);//finder_view is the custom widget of the demo

    source.setCrop(cropRect.top,cropRect.left,cropRect.height(),cropRect.width());


    /*filling the data, this is the source data of camera*/

    source.setData(data);


    /*decoding ,return value 0 means failure,>0 means successful*/

    int result = scanner.scanImage(source);


    Rect cropRect = finder_view.getScanImageRect(size.height, size.width);

    source.setCrop(cropRect.top,cropRect.left,cropRect.height(),cropRect.width());


    /*filling the data,this is the source data of camera*/

    source.setData(data);


    /*decode,returned value 0 means failure,>0 means success*/

    int result = scanner.scanImage(source);
the type of bar code.
    if (result != 0) {


        SymbolSet syms = scanner.getResults();

            for (Symbol sym : syms) {

              Log.i("sunmi", "type:"+sym.getSymbolName());//code type,such as “EAN-8”

              Log.i("sunmi","result:"+sym.getResult())//getting the result


              }


    }
More descriptions