T1 Debugging Descriptions
Background:
-
Why is it required to pass network debugging?
Currently, T1 main screen communicates with second screen via USB connection, with main screen as primary device, second screen as slave device and USB peripherals also as slave device. PC connects main screen or second screen via USB line to carry out debugging, with PC as primary device, main screen or second screen as slave device. At this time, the communication between main screen and second screen will be disconnected, and the connection of peripheral USB device will also be disconnected. Thus, to connect PC with USB line can only carry out the single debugging of main screen or second screen, and also leading to the disconnection of USB peripherals. That is to say, it’s impossible to debug the App applied to main & second screen at the same time, and it’s also impossible to debug the App applied to USB peripherals.
-
Sunmi has provided the solution to solve all the above problems:
PC connects T1 device via wired or wireless LAN, and it’s OK to debug the App applied in T1 double screen or USB peripherals without affecting the usage of T1 double screen communication and peripherals.
Debugging principle

Descriptions:
-
T1 main screen and second screen have been connected with each other via built-in USB line, without the need to connect with other USB lines;
-
PC need to be connected with T1 double screen device (main screen) via network;
-
Debugging main screen: PC debugs the main screen directly via WiFi/wired network;
-
Debugging second screen: PC first connects the main screen via network, then debugs the second screen via main screen bridging.
Front-loading conditions:
-
WiFi/wired LAN, the network connection is normal;
-
PC and T1 main screen are within the same LAN;
-
The versions of T1 double screen system all support double screen ADB debugging; (14 inch main
screen: V1.11.4 and above; 14 inch second screen: V1.8.3 and above);
-
T1 main screen enables USB debugging; (T1 main screen system setting-Developer setting-Enable USB
debugging);
-
Not to have an external connection of USB debugging line on double screen device; (main
screen/second screen external USB debugging line will cause the disconnection of double screen communication, you can only debug one of the screens);
-
PC supports ADB debugging environment;
-
T1 main & second screen communication is normal (open main screen’s “Second Screen Setting”, and you can check the system version information of the second screen).
Operating steps
1.Obtain main screen’s IP address
Check main screen IP in T1 Main Screen System Setting—About—Status Information, and record IP
address. For example:
192.168.1.122. Add terminal—main screen
Open the terminal command line tool on PC, enter the following command:
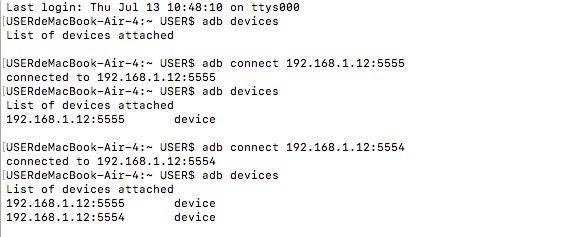
adb connect 192.168.1.12:5555Descriptions: “192.168.1.12” shall be replaced with the recorded main screen IP address, the port number corresponding to the main screen is “5555”, which cannot be modified. At this time, it shall be displayed that “Connected to 192.168.1.12: 5555”, which indicates that the main screen has been connected.
3. Add terminal—second screen, continue with step 2, enter the following command:
adb connect 192.168.1.12:5554Descriptions: “192.168.1.12” shall be replaced with the recorded main screen IP address, the port number corresponding to the second screen is “5554”, which cannot be modified. At this time, it shall be displayed that “Connected to 192.168.1.12: 5554”, which indicates that the second screen has been connected.
It is emphasized: the second screen must be connected after connecting the main screen first.
4.Query about the added terminal
Continue with step 2 or step 3, enter the following command:
adb devicesDescriptions: at this time, 1 to 2 terminal devices shall be displayed.
5.Debug the specified terminal
Continue with step 3, it is required to enter the following command when debugging main screen:
adb -s 192.168.1.12:5555 shell lsDescriptions: “192.168.1.12” shall be replaced with the main screen’s IP address, the port number corresponding to the main screen is “5555”, which cannot be modified. At this time, the directory of the main screen storage shall be displayed. “shell Is” can be replaced with other ADB commands.
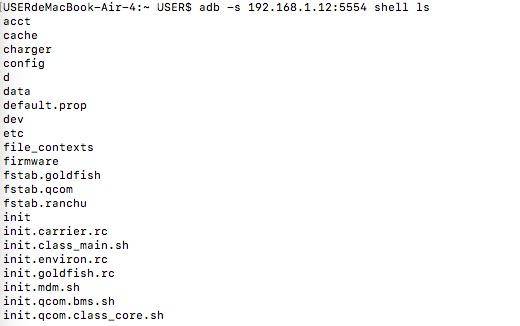
Continue with step 3, it is required to enter the following command when debugging second screen:
adb -s 192.168.1.12:5554 shell lsDescriptions: “192.168.1.12” shall be replaced with the main screen’s IP address, the port number corresponding to the second screen is “5554”, which cannot be modified. At this time, the directory of the second screen storage shall be displayed. “shell Is” can be replaced with other ADB commands.
6.Disconnect the terminal connection
Continue with Step 3, it is required to enter the following command when disconnecting main & second
screen:
adb disconnect 192.168.1.12:5555Descriptions: “192.168.1.12” shall be replaced with the main screen’s IP address, the port number corresponding to the main screen is “5555”, which cannot be modified. Right now, the connections of main screen and second screen shall be disconnected at the same time.
It is emphasized: the connection of the second screen will be disconnected at the same time when the main screen connection is disconnected.
Sample description
Add terminal:
Debug the specified terminal—main screen:

Debug the specified terminal—second screen:
Disconnect the terminal connection—main screen and second screen:
