预留预留
非金融设备
预留预留。。
金融设备
金融设备即P系列设备。P系列设备由于安全认证需求,目前终端使用者无法自行进行模式切换,需商米下发授权码后才可进行切换,操作步骤如下:
(1) 联系商米,提供需切换调试模式的设备SN
(2) 商米提供授权码后,在设置—关于设备中连续点击TUSN大约8次
(3) 在跳转界面输入商米提供的四位数字的授权码,进行切换
注意:P系列设备切换调试模式后,无法切换回正常交易模式。切换后屏幕上会永久存在风险水印,仅能用作开发用途。
Special Codes Description
Special Codes Description
One. Obtain Sunmi device identification
Sunmi suggests to judge whether it’s Sunmi
device by obtaining the following content:
1.
Brand name of the device (for
example: Sunmi)
The brand name of all Sunmi devices is uniformly: Sunmi
2.
The system model of the device
(for example: V1-B18)
The composition of the system model is:
product model + hardware features + “-” + software features
Among these model names, those beginning with V、M、P、L are handheld
devices, those beginning with T、D、S are landscape devices (up to December, 2017)
3.
ROM version number of the
device (for example: 1.1.0).
4.
ROM sequence number of the
device (for example: 128).
You can download Demo,create new android.os package (fixed style
of writing), place
SystemProperties.java under this package,
and obtain the specified values according to the following methods:
The code to obtain brand is:
String brand = SystemProperties.get("ro.product.brand");
The method to obtain model is:
String model = SystemProperties.get("ro.product.model");
The code to obtain ROM version number is:
String versionname = SystemProperties.get("ro.version.sunmi_versionname");
The method to obtain ROM sequence number
is:
String versioncode = SystemProperties.get("ro.version.sunmi_versioncode");
Two. Obtain SN number of the device
1.
Add the following permission in
AndroidManifest.xml.
2.
Obtain Sunmi SN number where
necessary with the following code.
try {
       Class c = Class.forName("android.os.SystemProperties");
       Method get = c.getMethod("get", String.class);
       Log.i("sunmi", "the sn:" + (String) get.invoke(c, "ro.serialno")));
       Log.i("sunmi", "First four characters:" + (String) get.invoke(c, "ro.serialno").substring(0, 4));
        } catch (Exception e) {
             e.printStackTrace();
        }
3.
Obtain customer SN number where
necessary with the following code. This code is limited
to contain maximum 16 digits or uppercase and
lowercase letters. (only supported by P1 device currently)
try {
       Class c = Class.forName("android.os.SystemProperties");
               Method get = c.getMethod("get", String.class);
               Log.i("sunmi", "the customer sn:"
                + (String) get.invoke(c, "gsm.serial1")));
            } catch (Exception e) {
                 e.printStackTrace();
        }
Three. Hide and recover the navigation bar
at the bottom
(Note: Sunmi has newly developed Kiosk
screen occupy mode without any modification of App. Hiding status bar and
navigation bar can be realized merely via cloud setting and it cannot be
realized via gesture. This function has been realized on T2、K1 device, and please contact technical support in terms of other
devices’ online progress: 400-902-1168 (9:00-21:00). It is suggested that the
partner apply Sunmi Kiosk screen occupy mode, which has obtained better
experience)
Android system has provided by default the
method to hide the system’s navigation bar, but it has a poorer support to
Dialog, which leads to the problem that the navigation bar pops up first before
hiding when the full screen dialog box is opened (splash screen). SunmiOS has
carried out restoration against this problem (post support from V1 system
firmware of 252 version and T1 system firmware of 132 version ).
1.
Full screen of Activity
——Android default support
 public static void setStickFullScreen(View view) {
 int systemUiVisibility = view.getSystemUiVisibility();
    int flags = View.SYSTEM_UI_FLAG_LAYOUT_HIDE_NAVIGATION
    | View.SYSTEM_UI_FLAG_LAYOUT_STABLE
    | View.SYSTEM_UI_FLAG_LAYOUT_FULLSCREEN
    | View.SYSTEM_UI_FLAG_HIDE_NAVIGATION // hide nav bar
    | View.SYSTEM_UI_FLAG_FULLSCREEN // hide status bar
    | View.SYSTEM_UI_FLAG_IMMERSIVE_STICKY;
     systemUiVisibility |= flags;
     view.setSystemUiVisibility(systemUiVisibility);
}
2. Full screen of Dialog
——Under the primary system, the bug of AOSP
will lead to the problem that the navigation bar pops up first before hiding
when the full screen dialog box is opened (splash screen).
  @Override
  public void onWindowFocusChanged(boolean hasFocus) {
    super.onWindowFocusChanged(hasFocus);
    setStickFullScreen(getWindow().getDecorView());
}
3.The way descriped above didn’t hid the Notification Bar & Navicatoin Bar, those bar will show again while the Dialog popup, we suggest you using custom dialog , calling the setStickFullScreen in the create method as following to solve this problem:
public AlertDialog create(boolean fullscreen) {
  LayoutInflater inflater = LayoutInflater.from(context);
   final AlertDialog dialog = new AlertDialog(context,
   R.style.DialogStyle);
   if(fullscreen){
   setStickFullScreen(dialog.getWindow().getDecorView());
   }
}
3. Display navigation bar after
setting hiding
3.1. Swiping up of global bottom
——After swiping up, the bottom navigation
bar is displayed for 4 s. After 4 s, the bottom navigation bar will be hidden
3.2. Switch App to other Apps (for example, jump to third party App
within App, third party
App popup, etc.)
——Switch to other Apps. Whether to display
bottom navigation bar or not is subject to third party App requirement. The
bottom navigation bar will disappear when switching to its own App
Notice:
- Cause there may encounter some security problems, we has restrict that the Notification Bar & Navicaton Bar can’t be hidden completely, slide from the bottom will activate those bar again.
- The bug of AOSP in Android will cause a problem that the Navication Bar will be hidden after a transient showing while the Dialog is popup, we have solve the problem in the latest version of SUNMI OS (After firmware version 332).
- The Navication Bar will show as the Input software is popuped , we have solve the problem in the latest version of SUNMI OS (After firmware version 332).
Four. To avoid repeated claim for peripherals
permission
When App needs to realize business via USB related
peripherals (for example, connect USB printer to print receipt), the user is
required by Android to manually confirm device permission, to guarantee the
user information security and prevent Trojan viruses from hacking USB devices.
1.
How to avoid App’s repeated
claim for this peripherals permission when the USB device
plugs again the same peripheral
It is necessary to check “Applied to this
USB device by default” when the user confirms manually. It is impossible to bypass
this security mechanism via code
Add property manageSpaceActivity in application on app’s Manifest file, and specify an Activity Page you want to enter when click CLEAR DATA in System Setting.
PS You can create an auto-finish Activity to avoid your data to be cleared.
public class ManageSpaceActivity extends Activity {

    @Override
    protected void onCreate(Bundle savedInstanceState) {
        super.onCreate(savedInstanceState);

        finish();

    }// onCreate
}
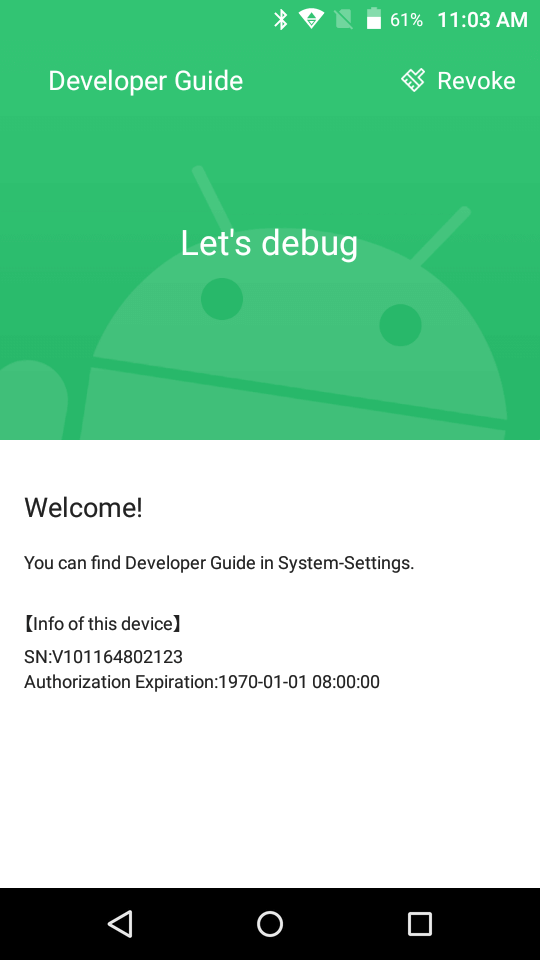
Debugging Devices
Debugging the Devices
About Sunmi device debugging
(This tutorial is only applicable to
non-financial devices. If you need to enable the debugging permission of Sunmi
series devices, please contact the sales
personnel)
You can debug after plugging in USB line to
default Sunmi device. Sunmi has also provided the control function for device
debugging permission. After the partner has enabled debugging permission
control in the background (as shown in the following figure), it is necessary
to obtain debugging permission via E-mail or mobile phone number to debug this
device. If you cannot directly debug, please check whether the partner
backstage has enabled this permission.
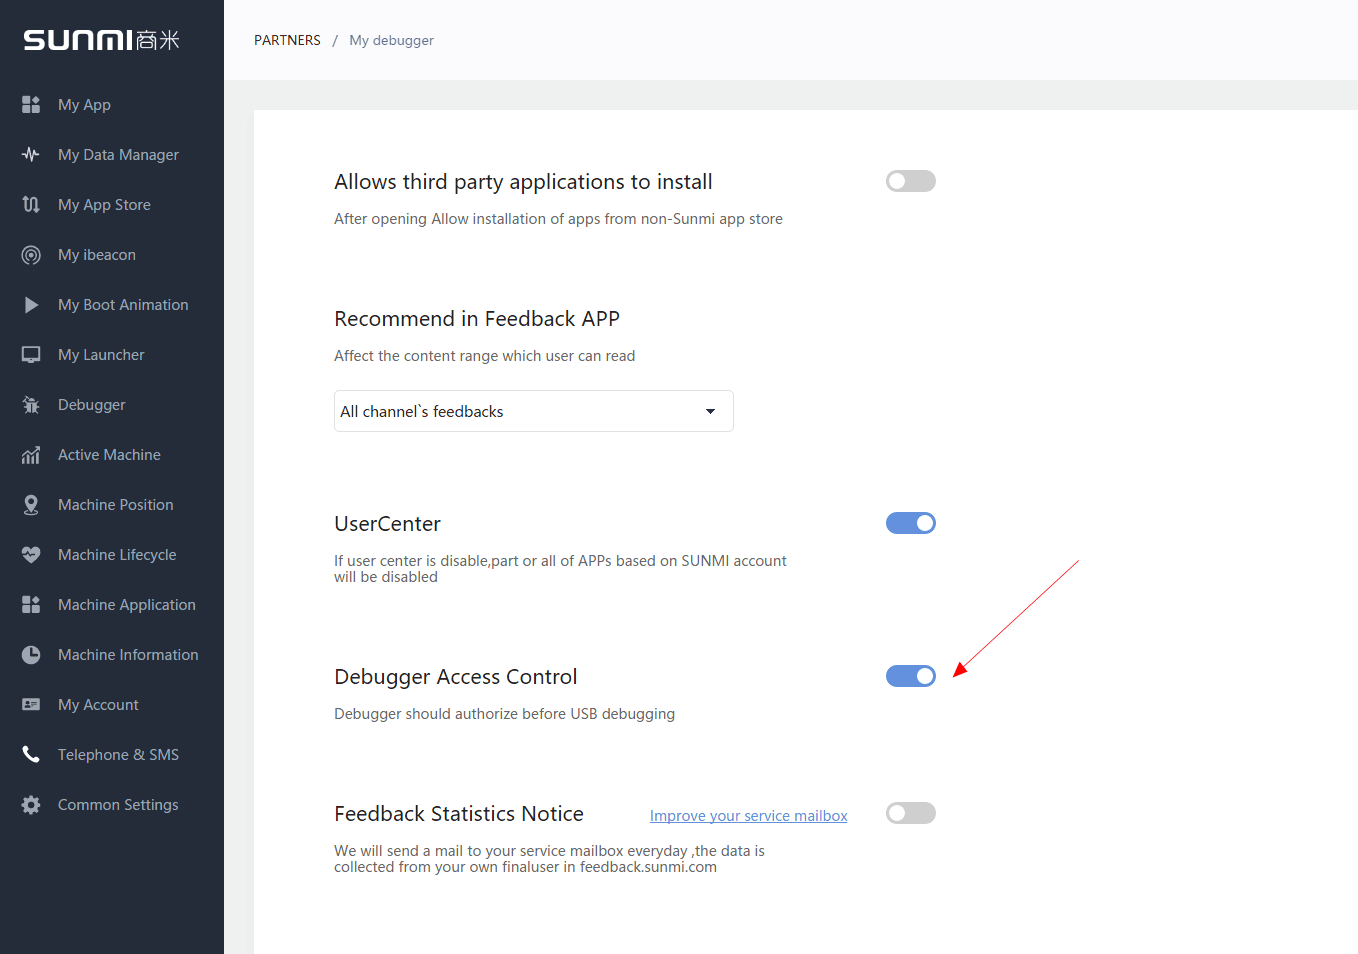
Note: the control of debugging permission
takes effect only to the devices that have bound partners (channels).
How to debug device while the permission is on
If the partner has enabled “debugging
permission control”, the developer need to obtain the debugging permission via
E-mail and mobile phone number on his/her own device to debug the device. The
partner can add the mobile phone number or E-mail of the debugging
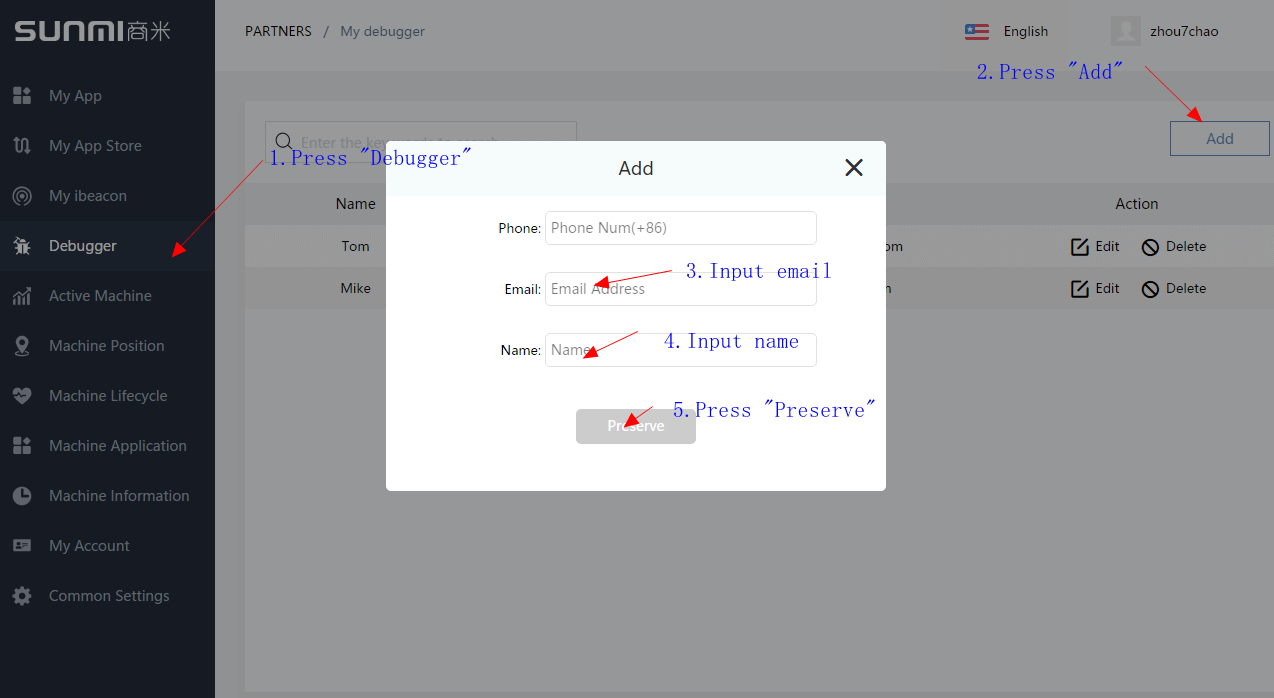
personnel (developer) on the Sunmi partner platform. Steps to obtain
the device debugging permission as follows:
1.Add debugging
personnel
Before debugging the device, the developer
is required to know the channel that the device belongs to. He/she can look for
the management personnel relevant to his/her own company for inquiry. The management
personnel needs to add the debugging
personnel’s mobile phone number or E-mail in Sunmi partner platform
background.
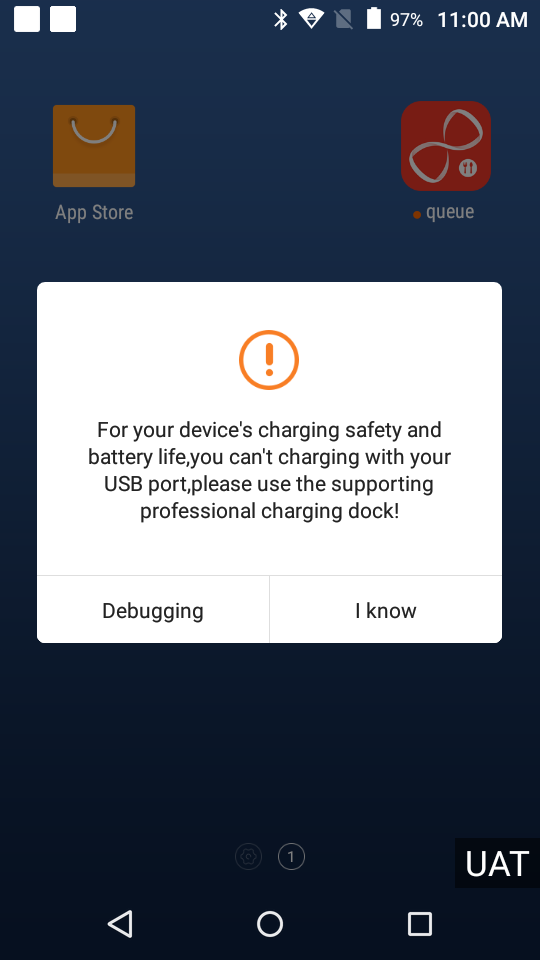
2. Plug in USB.(Please switch off the ‘debugging permission control’ temporarily on V1sV2M2L2)
Connect the device to the computer after
confirming that you have your own mobile phone number or E-mail for debugging
permission. It is suggested that the developer debug under windows. If the mobile
phone can be correctly recognized by the computer, the popup prompt as follows
will normally appear:
- Poor contact. Please confirm by
plugging & twisting USB port several times. - Data line fault. Try to change
one data line to see whether it can be recognized. - If the computer has not
installed mobile device driver, you may use third party tool software to install.
If the device has not been recognized by
the computer, please confirm whether it is caused by the following causes.
3.Get the veification code
Click the above “I want to debug” item, you
will enter the step of permission verification via mobile phone number or
E-mail. Meanwhile, the USB debugging mode of the device will be enabled by
customization (here it refers to the basic debugging mode, but not permission);
click “Got it” and it will quit the popup and USB debugging mode will not be
enabled.
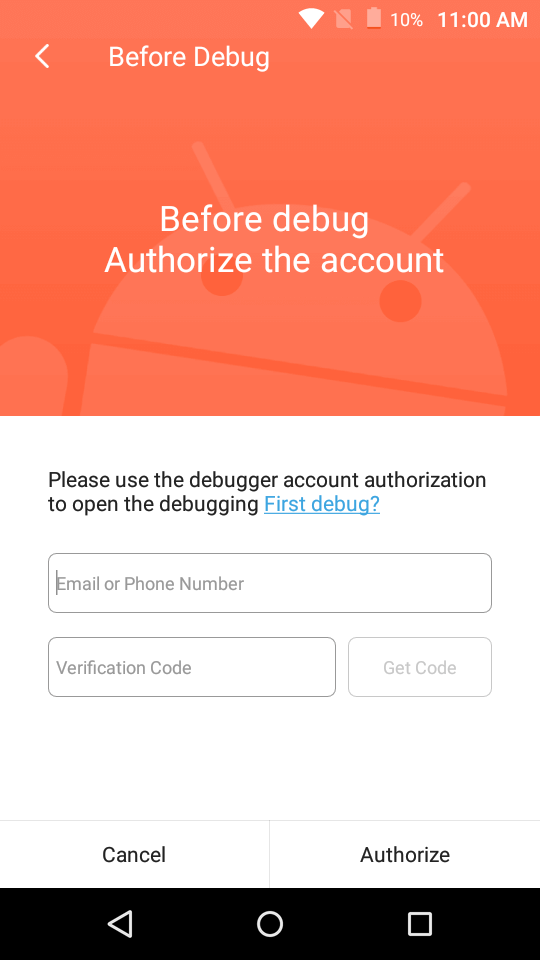
4. Verify the permission
Click “Obtain the verification code” after
entering the previously added mobile phone number or E-mail. Sunmi will send
the verification code to the mobile phone number or E-mail. Fill in the
verification code and click “Authorize and enable debugging”

5.Open the permission.
After opening the permission, you can check whether there is output
in logcat to judge if it’s OK to debug the device.